Stage 5
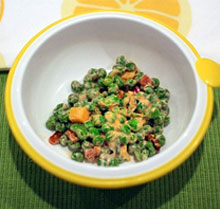
English pea salad is flavorful and nutritious. This dish is the perfect side for any picnic or party.
- 2 cup peas (fresh or frozen)
- 2 slice of apple wood smoked bacon, crumbled
- 1/2 cup sharp cheddar cheese, cubed
- 1/4 cup red onion, diced
- 4 tbsp plain greek yogurt
- 2 tbsp fresh mint leaves, chopped
- 1 tsp paprika
- Salt and pepper to taste
Toss uncooked peas, crumbled bacon, cheese, red onion and mint leaves together. In a small bowl, mix greek yogurt, paprika, salt and pepper. Stir the yogurt mixture in with the peas. Chill for 2 hours in the refrigerator.
Serve as a side dish or as a fun finger food snack. Serve cold.
Recipe Yields: 6 Servings
Storage Time: 5 days in the refrigerator
Peas are an good source of dietary fiber, Vitamins A, C, and B6.


Stage 5
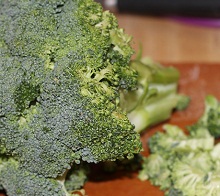
- 1/2 cup small cut florets of broccoli
- 1 chicken breast
- 2 tbsp butter
- 1 tbsp flour
- 1/3 cup parmesan cheese
- 1/4 cup milk
- Salt and pepper to taste
- nutmeg (optional for added flavor)
Steam broccoli and set aside. Bake defrosted chicken in oven for 25 minutes in a preheated oven of 365 degrees Fahrenheit. Remove from oven and cube chicken into bites size pieces. In a small sauté pan melt butter, add the flour stirring constantly and slowly add milk, continue to stir or whisk to avoid lumps. If the sauce is too thick slowly add a small amount more milk. Add cheese and nutmeg (if desired), pour over chicken and broccoli and serve. For younger children, pulse sauce, chicken and broccoli to desired consistency.
Pairs nicely with brown rice or whole wheat pasta.
Recipe Yields: 2 adult servings or 4 toddler servings
Store in an airtight container in the refrigerator for up to three days. Reheat before serving.
Storage Time: 3 days in the refrigerator
Stage 5

This recipe is packed with veggies, flavor and bright colors.
- 1/3 cup pasta, any fun shape your child likes
- 1 cup asparagus, chopped
- 18 grape tomatoes, cut in half
- 1/8 cup red onion, diced
- 1- 5oz mozzarella ball cut into cubes or 1/3 cup small mozzarella balls
- ½ cucumber peeled, seeded and cut into small chucks
- 4 black olives, sliced
- 1 tbsp honey
- 3 tbsp extra virgin olive oil
- 1 tbsp soy sauce
- 1 tbsp red wine vinegar
- salt and pepper to taste
Cook pasta according to box, during the last 5 of pasta boiling add asparagus to boil. Drain and rinse with cold water. While the pasta and asparagus is cooking, whisk together all dressing ingredients. Place all of the salad ingredients in large bowl and toss together with teh dressing.
Recipe Yields: 4-6 Servings
Serve immediately or chill and serve later.
Storage Time: 3 days in the refrigerator
This pasta salad recipe contains valuable vitamins and nutrients. One of the main ingredients in this recipe is asparagus. Asparagus provides antioxidant nutrients, including vitamin C, vitamin E, beta-carotene and several minerals including zinc and manganese. In addition, asparagus is a heart healthy vegetable that rich in fiber and aids in digestive support.

Stage 5
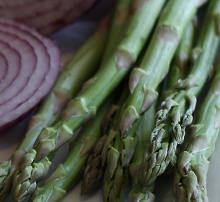
When choosing asparagus, the skinnier the stalks, the more tender they will be.
- 1 cup asparagus, chopped
- 1/4 lb boneless skinless chicken breast
- 2 tbsp butter
- 2 tbsp flour
- 1 1/4 cup whole milk
- 1/2 cup mild cheese – havarti, gouda, emmental (or whatever you have on hand)
Steam asparagus until tender. Preheat oven to 375˚, cook chicken for 25-30 or until 165˚. Combine the asparagus and chicken and pulse a couple of times in a blender, food processor or finely chop together.
For cheese sauce: Melt butter, quickly whisk in flour and slowly add the milk while continuing to whisk. Bring to a boil and continue to stir until sauce begins to thicken. Remove from heat and stir in cheese and any seasoning. Mix with the chicken asparagus blend.
Recipe Yields: 4 Servings
Storage Time: 3 days in the refrigerator
Asparagus contains valuable vitamins and nutrients. It provides antioxidant nutrients, including vitamin C, vitamin E, beta-carotene and several minerals including zinc and manganese. In addition, asparagus is a heart healthy vegetable that rich in fiber and aids in digestive support.
Stage 5
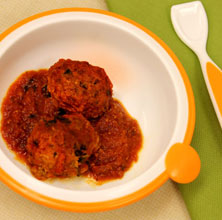
The combination of lean turkey and kale helps each meatball to pack a nutritional punch, and the inclusion of fresh basil is a nice way to introduce your toddler to a new flavor.
- 1 lb ground turkey
- 1 1/2 cups finely chopped kale leaves (without stems)
- 1 tbsp shredded parmesan
- 1/2 cup whole grain bread crumbs
- 1 tbsp fresh basil leaves
- 1/4 tsp salt
- 1/4 tsp pepper
- 1 whole egg
- 1/4 cup cottage cheese
- 3 cups marinara sauce
Combine turkey, kale, parmesan, bread crumbs, basil, salt and pepper.
Incorporate egg with meat mixture.
Incorporate cottage cheese with meat mixture.
Spray inside of slow cooker with nonstick cooking spray.
Roll the turkey mixture into 2-inch balls and place in your prepared slow cooker.
Pour the marinara sauce over the meatballs. You can use a prepared marinara sauce for this recipe. Just look for one that does not have a lot of added sugar or preservatives.
Cover and cook on low for 5-6 hours.
Serve over pasta, with sautéed zucchini slices or even cauliflower mash.
Recipe Yields: 6 Servings
Storage Time: 3 days in the refrigerator
Turkey is a potent source of lean protein and iron, and kale is an excellent source of vitamins A,C, and K.
Stage 4 + 5
Fresh or dried figs work well for this snack.
- 2 whole fresh figs (dried figs can be used also)
- 8 oz marscapone
- 1/8 tsp ground nutmeg
- 1 tbsp maple syrup
For the marscapone dip, stir the nutmeg and syrup into the marscapone until it is soft and creamy. Remove stems from fresh figs and cut in eighths for dipping. One fig and one tablespoon of dip is a serving.
The marscapone dip can be stored in the fridge for up to 4 days.
Figs are a very good source of potassium. They are also a great source of fiber.

Stage
Cooking with Cat: Cheesy Spinach Quinoa
A delicious and healthy meal for your toddler.
This nutritious and easy recipe is perfect for toddlers transitioning into Stage 3, and it offers enough flavor for mom and dad to enjoy. This dish serves as a potent source of vitamins and nutrients that are needed for a balanced and healthy diet. Spinach is an excellent source of Calcium and Iron which are essential to our health. Calcium helps strengthen bones, and Iron is important for muscle protein. For more information on the necessary nutrients your baby needs, check out our Nutrient Chart.
This recipe will yield 6 servings.
Here is what you will need:

- 1 tbsp olive oil
- 1/4 cup finely chopped onion
- 1 tbsp minced garlic
- 1 cup white (or yellow) quinoa, rinsed
- 2 cups chicken broth
- 4 cups chopped spinach
- 1/2 cup shredded Parmesan cheese


Stage 5
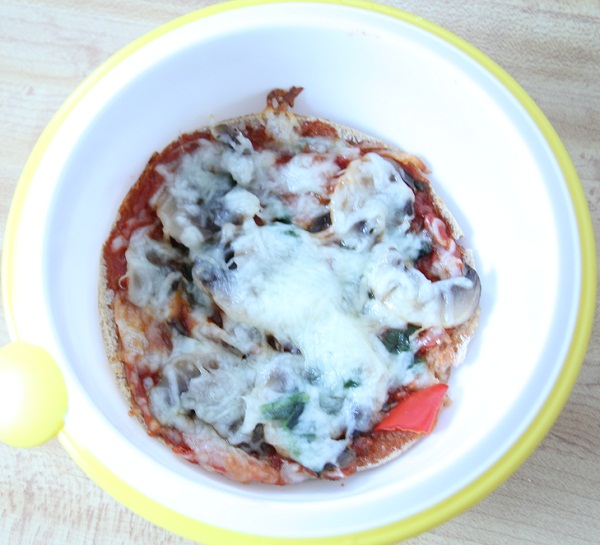
- 1 whole wheat sandwich round or pita
- 1/4 cup Pizza sauce
- 1/4 cup Mozzarella cheese, grated
- 1/4 cup Mushrooms, sliced, cooked and cooled
- 1/4 cup Zucchini, sliced, cooked and cooled
- 1/4 cup Sweet red pepper, sliced, cooked and cooled
- 1/4 cup Spinach, cooked and cooled
Open up sandwich round or pita and spread pizza sauce onto both halves.
Put each of the cooked vegetables into small bowls. Have your child choose toppings from the bowls to build their favorite pizza.
Top each pizza with grated cheese.
Bake both pizzas on a cookie sheet at 400 degrees Fahrenheit for 5-7 minutes, or until cheese is melted. Let cool and serve.
Recipe Yields: 2 Servings

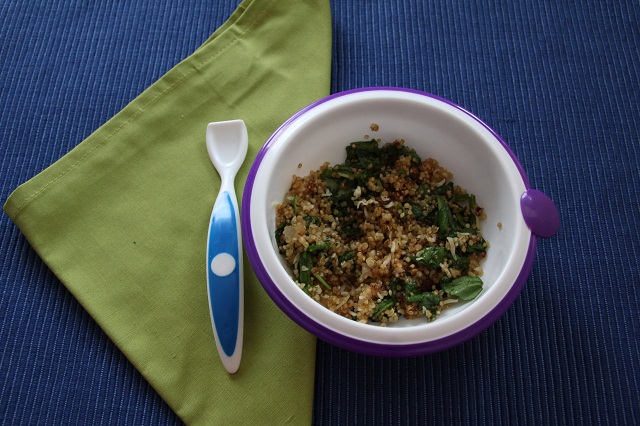
Stage 3 + 4 + 5
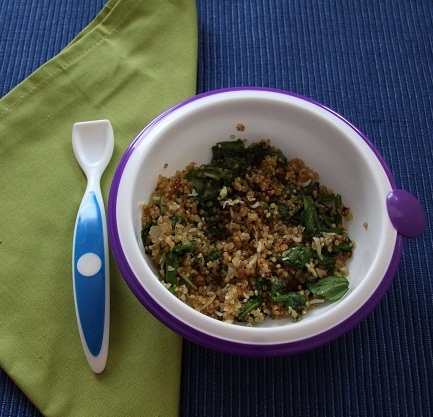
Perfect for toddlers transitioning into Stage 3, and this dish offers enough flavor for mom and dad to enjoy too.
- 1 tbsp olive oil
- 1/4 cup finely chopped onion
- 1 tbsp minced garlic
- 1 cup white (or yellow) quinoa, rinsed
- 2 cup chicken broth
- 4 cup chopped spinach
- 1/2 cup shredded parmesan cheese
Heat oil in a large skillet over medium heat. Add onion, garlic and quinoa to oil., stirring until quinoa is lightly toasted. Pour broth into the pan and bring to a boil. Cover and simmer until quinoa is tender, about 25 minutes. A white “halo” around the quinoa grains is a sign that they are done cooking. Remove from heat.
Fold in chopped spinach and parmesan cheese, stirring until spinach is wilted. Serve warm.
Recipe Yields: 6 Servings
Cover and store in the refrigerator.
Storage Time: 3 days in the refrigerator
This recipe is a great source of vitamins and nutrients that are needed for a balanced and healthy diet.
Stage
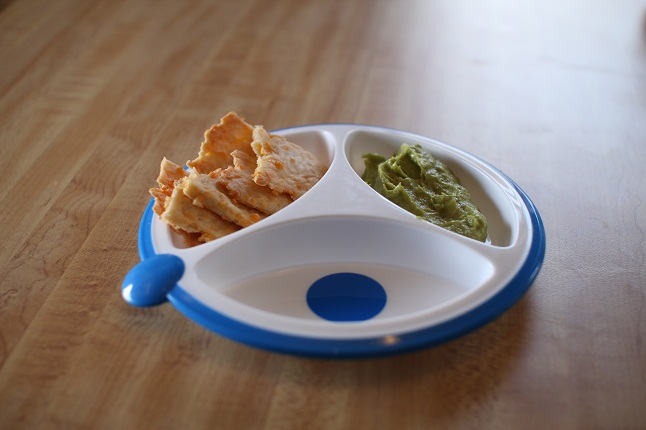
Cooking with Cat: Crispy Cheese Crackers & Avocado Dip
A perfect snack for your toddler.
Ever since I read this recipe I have been dying to try it on my own. I buy cheese crackers at the store all of the time, but I have never considered making my own. I like the idea of making my own crackers, that way i know exactly what goes into them. Pairing them with avocado dip seemed like a natural choice. Avocado is a great food for baby, and using it as an ingredient in a dip is a great way to encourage your toddler to give it a try.
This recipe was much easier than I expected and only took 45 minutes from start to finish.
Here is what you will need: 
1/4 cup softened butter
1/4 tsp sea salt
1 cup shredded cheddar cheese
1 cup flour
1/4 tsp baking powder
1 tbsp cold water

Pour salt into the bowl with butter.

Mix until creamy.

Add cheese and mix well.

Gradually add flour and baking powder.

Mix until well blended.

Add water and mix until dough begins to ball.
Note * I had to add a little extra water to get the dough to the right consistency. If you run into the same issue, just add 1 tablespoon at a time until the dough begins to ball.

Roll dough into a ball with hands.

Place between two pieces of parchment paper and roll dough into 1/8 inch thickness on a cookie sheet.
Note* The thinner you roll the dough, the crispier the Cheese Crackers will be.

Remove the top piece of parchment paper, and cut dough into 1 1/2 inch squares.

Bake for 15 minutes on 350 degrees Fahrenheit or until lightly browned. Turn the oven off and leave crackers inside to crisp up.
Note* I left them in the oven for about 10 minutes and they came out perfectly.
While the Cheese Crackers are baking, you can prepare the avocado dip.
Here is what you will need:

2 avocados
1 clove garlic, minced
3 tablespoons vegetable juice

Peel and pit two ripe avocados.
The softer the avocado is, the easier it will be to blend.

Cut the avocado into small pieces.

Mix avocado into the bowl with the vegtable juice and garlic.


Using immersion blender, blend until smooth.

Remove the Crackers from the over and let them cool.


Serve them right away or store them for later.


The crackers can be kept in an air-tight container for a week. Store the avocado dip in the refrigerator for up to three days. If you are going to keep it in the fridge, you may want to add a few drops of lime juice to keep the avocado from turning brown.

Mmmmm! You also might find that your little one wants to store them in their tummy right away. Yum!
Join the Designed to
Nourish community by
registering today!
It’s the best way to get information tailored to your child’s specific needs. Plus, you’ll be eligible to win valuable prizes and be the first to find out about new products.